I’m often asked about the tools I use when making jewellery. So here are the tools I use and love!
The great thing about making jewellery is that you don’t need many tools to start, but then you can add to your toolbox with upgrades and specialist equipment as your crafting journey continues.
* I include below my picks and recommendations and some of the links provided are affiliate links, which means that I receive a small percentage of each sale made through these links. These affiliate links are marked by an asterisk and your support through using them is hugely appreciated! *
Basic Jewellery Pliers
My own jewellery making journey beginning with the basic set of three pliers – round nose, chain nose and wire cutters – and I say this is probably the only essential for getting started. These will enable you to cut and create loops on headpins and eyepins, open these loops, flatten crimp beads, and create wire work.
When buying pliers, it is worth considering the size and type of handles – and looking for those that fit comfortably in your hand. Pliers should also have a good spring action, so that they open easily and you don’t need to overstretch to start closing them.

My picks: I’d recommend getting a basic set of pliers to start, then upgrade later when you know what types you prefer. My suggestions are therefore:
In the US: https://amzn.to/3s4qqax* In the UK: https://amzn.to/2GoqeFA*
Wire Cutters
Most of the basic toolkits include side cutters. These are absolutely fine to use, but you might want to upgrade fairly quickly to flush cutters. These give you a clean, straight cut at the end of the wire for a cleaner, more professional finish.
My pick: I’ve had my Beadalon flush cutters for over 4 years now, with no problems and they are still cutting well, so I happily recommend them:
In the US: https://amzn.to/2wLJn4L* In the UK: https://amzn.to/2k23bYw*
Micro flush cutters are also worth considering for wire-wrapping, as they can get into the tight spaces so you can cut where you need for the neatest finish.
My pick: Mine are Xuron brand and I love them!
In the US: https://amzn.to/2IodyQY* In the UK: https://amzn.to/2InGzMB*
If you are using memory wire, do not – repeat – DO NOT try to cut this with your normal cutters! All you’ll end up with is a notch in your previously perfect blades where you’ll never be able to cut anything again. So don’t ruin your cutters, get some memory wire cutters that have tougher blades and are designed for the job.
My pick: I have Memory Wire Shears from Beadalon and they cut through memory wire really easily.
In the US: https://amzn.to/2L7bJcH* In the UK: https://amzn.to/2Gq3fd8*
Round Nose Pliers
I used the same round nose pliers for many years and the only upgrade I’ve found that I needed was to get a finer point so I could make smaller loops. I do use my bail-making pliers (see below) for larger loop-making so those and the fine round nose pliers cover my needs.
My pick are these fine round nose pliers from Beadsmith
In the US: https://amzn.to/2rOCNWj* In the UK: https://amzn.to/2L842TQ*
Chain and Flat Nose Pliers
As with the round nose pliers, the standard chain nose pliers have worked well for me for years. But I added fine flat nose pliers to my toolkit and they have been well worth getting. They can reach into the tightest spaces and grip the wire really well. Because they are so narrow, I also find that I can use them to adjust curves in my wire, without creating a flat spot.
My pick: I have the Xuron TweezerNose™ Pliers and can thoroughly recommend them. They hold the wire really well without marring it, are very slim, yet strong enough to bend 1mm wire easily.
In the US: https://amzn.to/2IocrF1* In the UK: https://amzn.to/45qIzOq*
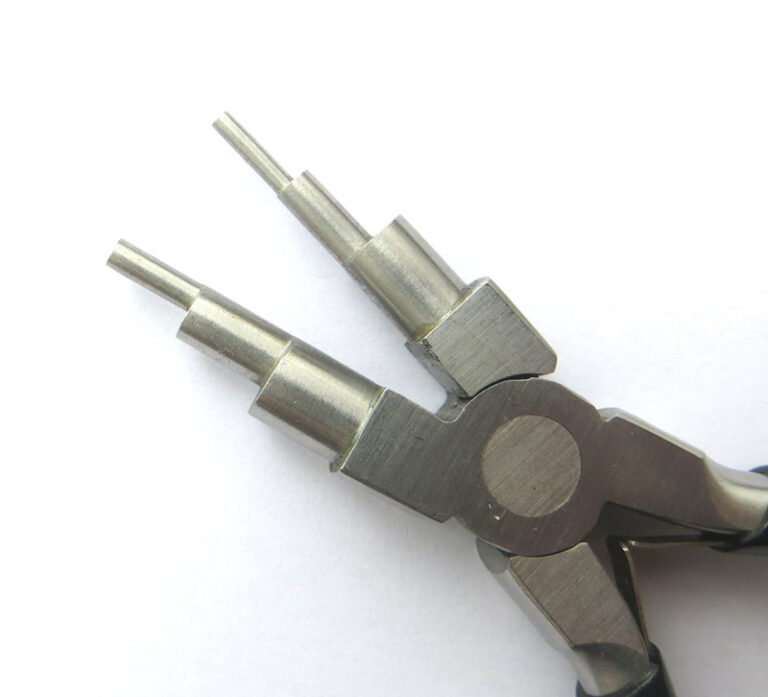
Bail Making Pliers
These were the first ‘treat myself’ upgrade I ever made and I find myself using them all the time! I love that they make consistent loops for my projects and each step is long enough to make a decent length of coil for making jump rings. They are also great for shaping ear wires and hook clasps. I would go as far as to say that once you get some you’ll wonder what you ever did without them!
My pick: There are loads of multi-size pliers out there with different combinations of steps but I’ve found that my 6-step pliers cover everything that I want them to do, with the step sizes of 2,3,4,6,8 and 9mm
In the US: https://amzn.to/2rNCSJK* In the UK: https://amzn.to/2rKMLbk*
Twisting Tools
You can twist wire using a drill or rotary tool, but I like the control of hand tools which means you can keep checking and stop as soon as you have the twist you want.
My picks: There are two tools I recommend. For finer wire (up to 0.8mm/20 gauge wire) the Wire Twister Tool is perfect. You can twist up to 5 wires together and it is really easy to use.
In the US: https://amzn.to/2YCFx8o* In the UK: https://amzn.to/2L7hMyg*
For thicker wires (1mm/18 guage and wider) I use the Wire Twisting Pliers. They can be a little tricky to start with, but once you get used to them, they’re great. They are heavy duty, so handle the thicker wires easily.
In the US: https://amzn.to/3DUrBfi* In the UK: https://amzn.to/3YLQ2FH*
Rotary Tools
A rotary tool is great to have for both drilling and polishing, with an abundance of mops, disks and burrs to use with it. Do make sure, though, that the shank of your attachments will fit into your rotary tool.
My pick: I decided to treat myself to the Foredom pendant motor, and I haven’t regretted it. Because the motor is separate from the handpiece, it’s not heavy to hold and therefore not fatiguing. And I have only heard good things about the build quality, longevity, and customer service.
In the US: https://amzn.to/2YCgX7u* In the UK: https://amzn.to/2Pzj7AJ*
Hammers
When beginning, most will get a simple flat-faced jobbing hammer, and this is fine for getting used to hammering. But there are many specialist hammers that are worth investigating and this is one area that I keep adding to. As each is intended for a particular purpose, they make hammering easier – and more enjoyable!
My picks: My particular favourites are the raising hammer, planishing hammer, riveting hammer and rawhide mallet.
Raising Hammer: This is for stretching metal, and the heads are curved in one direction so that the metal will stretch in just one direction, giving more accurate control.
In the US: https://amzn.to/2rLMtke* In the UK: https://amzn.to/2L5P5lh*
Planishing Hammer: This is intended for removing the marks left by other hammers and I also often use it for hammering wire. It has one flat face and one that is gently curved – which is very helpful in reducing the chance of denting the metal with the edge of the face!
In the US: https://amzn.to/2wMkqWL* In the UK: https://amzn.to/2IqepjU*
Riveting Hammer: As the name implies, this is used when making rivets, but it’s small, lightweight head means it is useful for a number of precision jewellery jobs, including work-hardening wire.
In the US: https://amzn.to/2IHyNk2* In the UK: https://amzn.to/2jZV5zo*
Rawhide Mallet: This is used for shaping metal without marking it and can also work harden wire without flattening it. I opted for a rawhide/copper mallet for a dual purpose and mine is the 2lb version, although I believe the 1lb version would be plenty heavy enough for making jewellery, and would reduce fatigue.
In the US: https://amzn.to/45q2ayc* In the UK: https://amzn.to/2rNa9nz*
Mitre Jig
This is a fantastic little gadget that I found to be invaluable for soldering preparation. It helps in cutting and filing straight, accurate edges for sheet and wire. Using this jig gives a nice flush join that is essential in soldering.
My Pick: I chose the multi angle jig – I mostly use the 90° angle, although there is also 45° and 60° options within the same tool.
In the US: https://amzn.to/2IlLW2S* In the UK: https://amzn.to/2IJxAbT*
Torch
To get the most from working with bare copper, I highly recommend getting a torch. This means you can then use the techniques of balling wire ends, soldering, fusing and heat colouring.
My pick: I recommend starting with a small handheld torch. There is a limit to the heat it will produce and therefore the size of the piece you can heat, but I’ve successfully used a small torch for 99% of my jewellery.
In the US: https://amzn.to/444Lds2* In the UK: https://amzn.to/2IojGwq*
Dapping Block and Punches
This is a ‘must have’ for doming metal, resulting in an even dome with a range of size options. The punches are also needed for techniques such as air chasing.
My pick: The set I have has 24 punches, ranging in size from 2.3mm to 25mm, which gives me the options I need for their use.
In the US: https://amzn.to/3YDz9wD* In the UK: https://amzn.to/3OUSjel*
Bench Vice
The essential tool for holding your work. I use it particularly when air chasing, and it is also useful when you just need that third hand!
My pick: I’ve only need a small 2″ vice so far and a swivel base makes working on pieces so much easier.
In the US: https://amzn.to/45r1F6M* In the UK: https://amzn.to/2Bmnmc0*
The ‘unsung heroes’
These small, unassuming tools never get much attention, but make my work just so much easier!
Ring Clamp: Intended for holding rings while working on them, I have found this is also brilliant for holding frame wires whilst weaving.
In the US: https://amzn.to/2rKH0dA* In the UK: https://amzn.to/2IopYMy*
Awl: Invaluable for making spaces in wirework to get your weaving wire through. This is probably my most used tool after my pliers!
In the US: https://amzn.to/447B65N* In the UK: https://amzn.to/3KEpYpT*
Bobbin: These are generally used to hold cord for kumihimo, but are also great for holding weaving wire and preventing it getting tangled.
In the US: https://amzn.to/2wMNRIy* In the UK: https://amzn.to/2L5uxJC*
Bead Mat: The background to all of my tutorials! It prevents your beads rolling off and ending up under the furniture and is just a great surface for working on.
In the US: https://amzn.to/3qttlZX* In the UK: https://amzn.to/2Iq63Ja*
Centre punch: This makes the little dent in metal that stops your drill skidding off to where it’s not wanted. I wouldn’t drill without it!
In the US: https://amzn.to/3s7diBD* In the UK: https://amzn.to/2KxBP7T*