A rolling mill is the tool that could change your jewellery making life. But it is a large initial investment, so deciding which to buy can be quite daunting. With that in mind, I’ve put together a few things to consider before making that purchase.
And if you want to see me unboxing my very first rolling mill, take a look at this video:
Where will the rolling mill go?
Deciding where to put your rolling mill is important, as it is just too heavy to move around frequently and needs to be bolted into place. It can sit on a solid surface such as a heavy desk or workbench, or you can purchase the stand specifically made for it. Bear in mind, if you take this option, that the stand itself will need bolting to the floor.
You will also need enough space to turn the handle, above, behind and below the rolling mill. If you are left-handed, you can orientate the rolling mill accordingly.
If you are using your own desk or bench, make sure the mill will be at such a height as to be comfortable to use.
What do you want to use it for?
Before buying, it is worth thinking about your intended uses. Will you be primarily working with sheet, and if so, how large will that sheet be? Or are you going to be making, re-shaping or re-sizing wire? and in what shapes/sizes? This will influence the type of rollers to get.
Some mills have entirely flat rollers for sheet, while others are entirely made with grooves for wire. For the most options, you can get combination mills, that include a flat section for sheet and grooved sections for wire. And they will come in a variety of widths to suit your needs.
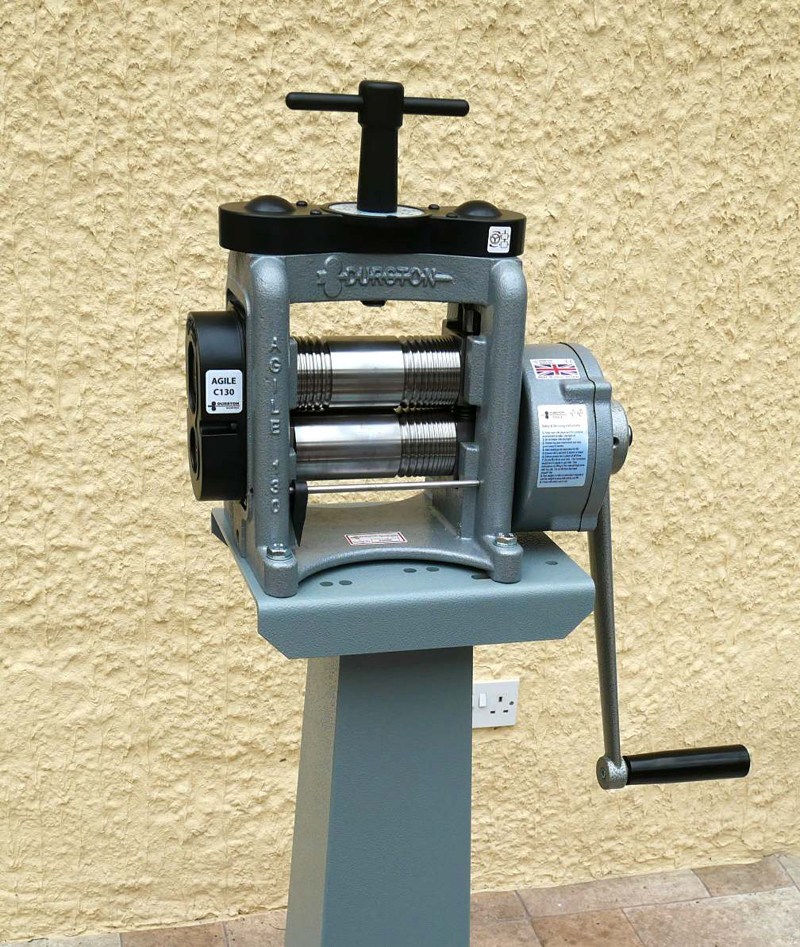
For example, my rolling mill is a combination mill – the Durston C130. It’s rollers are 130mm wide, split into a 60mm wide flat section for sheet, 5 grooves for D-section wire, from 6mm down to 2mm and 11 grooves for square wire. This is giving me loads of options for projects.
Gearing
The cheaper rolling mills tend to have a ‘direct drive’, so one turn of the handle equals one turn of the rollers. This is fine, but may require quite a bit of force to turn. My rolling mill has a 5-1 gearbox (some others are 4-1). This means that to turn the rollers 1 complete turn, you need to turn the handle 5 times. But it also means you are using about 1/5 of the force to turn it. From my experience so far with the mill, I am more than glad of this!
It remains comfortable to turn, and I’m not wearing myself out with the multiple rolling required to create sheet. The gearing also helps prevent ridges in the sheet.
Do you need any accessories?
Rolling mills are fairly self contained. Mine needed it’s handle to be attached and included the allen key for that. You may need the bolts to secure it with.
While purchasing, though, it is worth thinking whether you want anything in order to get rolling straight away. This might be texture plates, or other materials to texture with. Brass sheet to help protect the rollers if you are using steel textures, or some sheet to texture with!
I can personally vouch for the fact that texturing is a bit addictive! So I would recommend getting some copper sheet, and gathering together anything that might work as a texture – skeleton leaves, lace, cupcake wrappers – anything that is dry. Then you’re ready to start experimenting as soon as you get your mill!
If you want to see the mill I have, head to the Durston Tools website. From there you can also check out their range of rolling mills. Please note that this is an affiliate link, which means that I receive a small percentage of each sale made through this link.
I hope that helps you decide on the best rolling mill for you. And happy rolling!!